


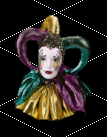
Fortunately fixing A-Buffers is really easy. So what we are going to do, is fix this object – Click to Download
When you unzip this, pop the object in the folder labelled C:\Maxis\The
Sims\Downloads\Transmogrified.
(If you don’t have one, make one).
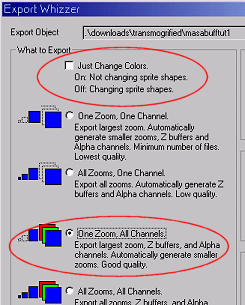
| Open up T-mog and Export
our object using "One Zoom, All Channels", and un-tick the box
that says "Just change colours".
Normally we would choose All zooms to fix Far, mid and near views Personally, I normally let T-mog generate the mid and far zooms, and then just fix them later if necessary. Since we choose only 1 zoom, T-mog will export just the largest view that is the near zoom. For this exercise – we're going to do just the one. The reason why we choose all channels is that this is the only way we get the a-sprites exported. If we chose 1 channel, only the p-sprite would be exported, and the A-sprite and Z-sprite would be AUTO-GENERATED by the T-mog program. Yuck! Not a good look. (That’s how I got the object in the first place!) |
 |
|
TIP: When you are changing the shape on an object or fiddling with the A’s and Z’s always export with "All Channels". |
Open up your paint program, and open up the bitmap with the –a at the end of its name.
Normally when you’ve got more than one A-buffer to do, you open them all up
at the beginning. The reason why we do this is because it is easier to keep
track of which one’s we’ve done. It’s generally a good idea to complete
all the a-buffers in one session –that way none get left out. (It can be
really tedious – plan a reward of some sort at the end to encourage yourself
to persevere with them.)![]()
OK, Choose the mask tool [M] (Everything in square brackets is the keyboard shortcut for the same action)
![]() is the
Mask Tool. Set it up with these options: Match Mode = RGB, Tolerance = 0,
Feather = 0
is the
Mask Tool. Set it up with these options: Match Mode = RGB, Tolerance = 0,
Feather = 0
There are at least two Methods for selecting the Pixels to fix:
| 1. Select all the dark grey borders by clicking on each part, while holding down the shift key. (Holding down the shift key will add each new selection to the existing selection). |  |
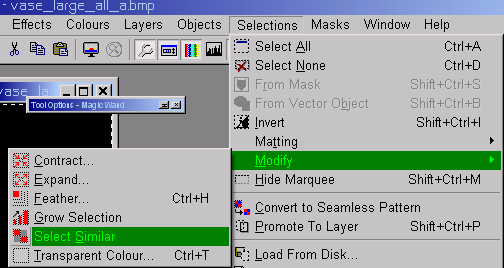
| 2.
Alternatively, select just one part, then go up to the menu
and choose "Selection", "Modify", "Select
Similar" – this will do the same thing.
(This is useful when we’ve got lots of little fiddly bits.) |
 |
| On the
Standard menu , Choose "Effects", "Noise" "Edge Preserving Smooth", and set "Amount of Smoothing" to 30. Press OK to do it. |
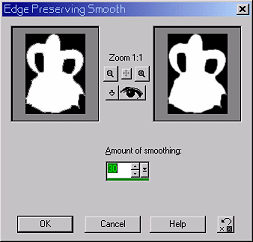 |
| Look! We have fixed the A-buffers! | 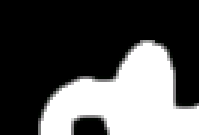 |
Save the fixed A-buffer [Ctrl-S] and close the window so it goes.
OK. So that was easy wasn’t it?If we’d done more zooms, you’d get to do the rest now by repeating steps 3-4 for each bitmap until they are all done.
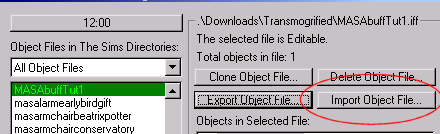
The object isn't fixed until our new A-buffers are installed in the the "iff" object. To do that we need to import our changed sprites back.
We’re going back into T-mog now (If you closed it down before, just open it up again). Find our object, and press the import button.
Now go look at it (view object) – A whole lot better, yeah? Try clicking on the background to see how it will look on a black or white background
OK. We're done. You can go play with it now!
Alternatively, you can keep
on going with tutorials